

This lesson is made with PSPX9
But is good with other versions.
© by SvC-Design
Materialen Download :
Here
******************************************************************
Materials:
winter0.jpg
alfa.psp
kleuren.jpg
Leny-decowinter.png
Leny-decowinter2.png
Leny-decowinter3.png
Leny-tekst.png
NarahsMasks_1511.jpg
******************************************************************
Plugin:
Effects - plugin -Unlimited 2.0. - Plugin AB 07 - Break Out Randomly
Effects - plugin - Unlimited 2.0. - Plugin AB 03 - Weird Angles
Effects - plugin - Flaming Pear - Flexify 2
Effects - plugin - VanDerLee - Unplugged - Laserrays
Effects - plugin - Filter Unlimted 2.0 - [AFS IMPORT] - sqborder2
Effects - plugin - Filter Alien Skin Eye Candy 5-Impact-perspective shadow
Effects - plugin - Filter Unlimited 2.0. - Plugin AB 01-Grainy Mods
Effects - plugin - AAA Frame - foto frame
Effects - plugin - Filter Graphics Plus - Cross shadow
******************************************************************
color palette
:

******************************************************************
methode
When using other tubes and colors, the mixing mode and / or layer coverage may differ
******************************************************************
General Preparations:
First install your filters for your PSP!
Masks: Save to your mask folder in PSP, unless noted otherwise
Texture & Pattern: Save to your Texture Folder in PSP
Selections: Save to your folder Selections in PSP
Open your tubes in PSP
******************************************************************
We will start - Have fun!
Remember to save your work on a regular basis
******************************************************************
1.
Foreground color :# cad5db
And on gradient with the settings below.
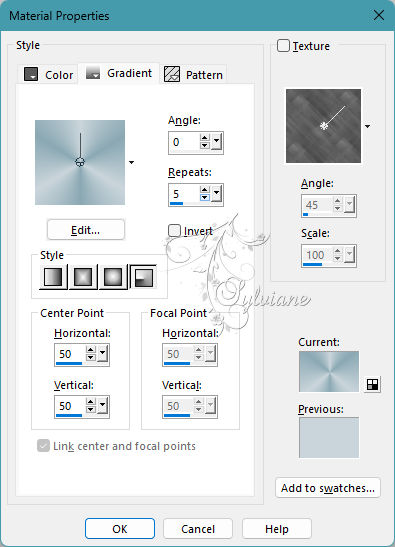
Background color:# 8aa7b4
2.
Open alpha in PSP.
Window - duplicate
Minimize the original - we are working on the copy
3.
Fill the image with the gradient
4.
Adjust - Blur - Gaussian blur -
range: 30
5.
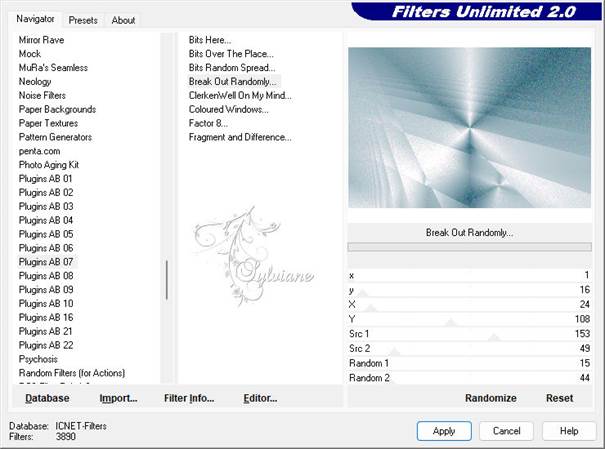
Effects - plugin -Unlimited 2.0. - Plugin AB 07 - Break Out Randomly - Default
6.
Layers - Duplicate
7.
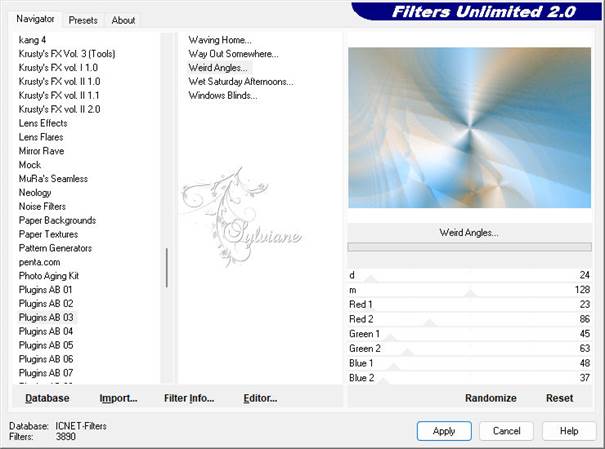
Effects - plugin - Unlimited 2.0. - Plugin AB 03 - Weird Angles - Default
8.
Layers - Duplicate
9.
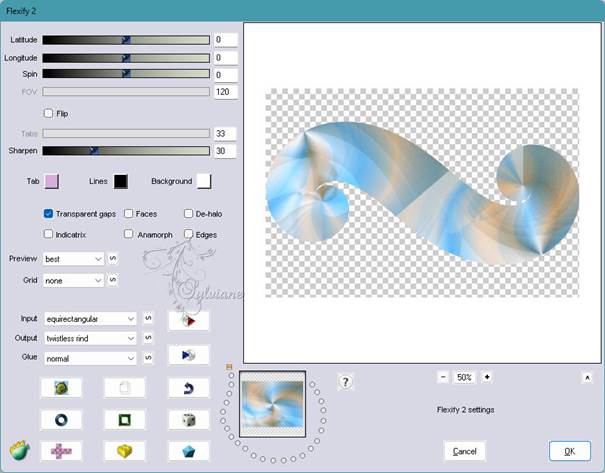
Effects - plugin - Flaming Pear - Flexify 2
10.
Effects - Edge Effects - Enhance
11.
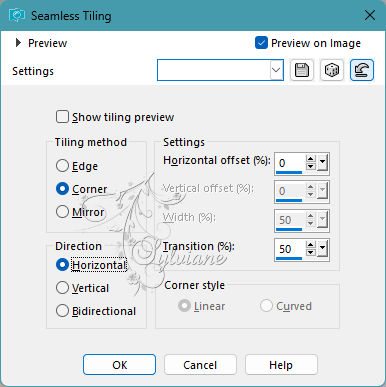
Effects - Image Effects - Seamless Tiling
12.
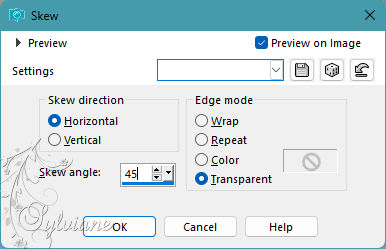
Effects - Geometric Effects - Skew
13.
Effects - 3D effects - Drop shadow
0/0/100/1 color:#000000
14.
Activate Copy of Raster 1
15.
set the blend mode to Hard Light.
16.
(If you use your own colors it may look different, use another option)
17.
Activate Copy (2) of Raster 1
18.
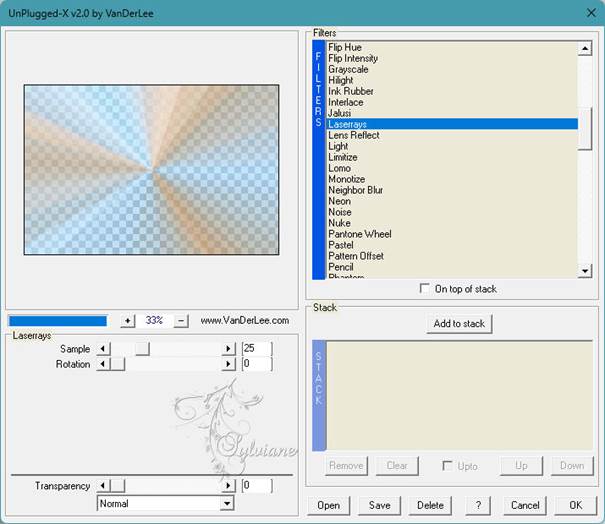
Effects - plugin - VanDerLee - Unplugged - Laserrays
19.
Make the top layer your working layer
20.
Selections - Select all
21.
Selections – float
22.
Selections – defloat
23.
Layers - New raster layer
24.
Flood fill the layer with color 64809b
25.
Selection - Select None
26.
Effects - Image Effects - Offset
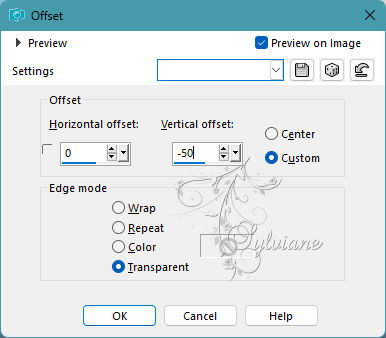
27.
Effects - plugin - Filter Unlimted 2.0 - [AFS IMPORT] - sqborder2
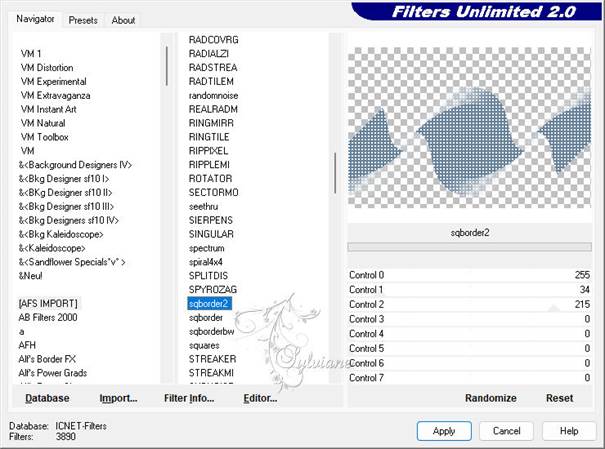
28.
Effects - plugin - Filter Alien Skin Eye Candy 5-Impact-perspective shadow
Click Basic and set the settings as below
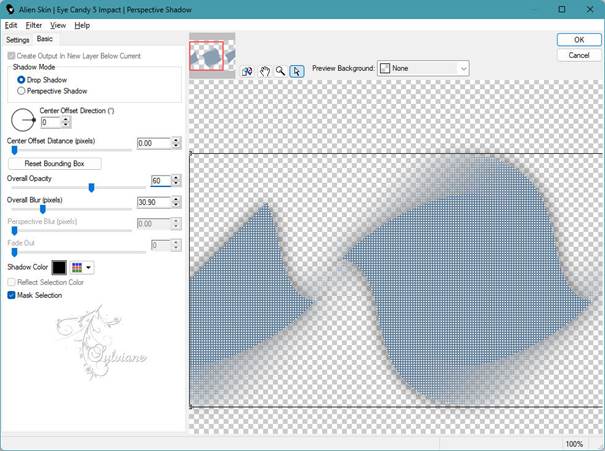
29.
Layers – arrange – move down
30.
Activate Raster 1
31.
Selections - Load/Save selection - Load selection from alpha channel - selectie 1
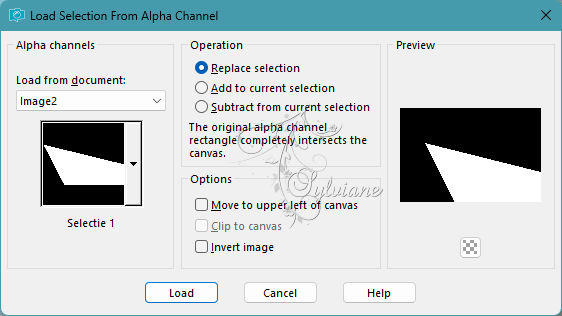
32.
Selections – Promote selections to layer
33.
Selection - Select None
34.
Layers – arrange – bring to top
35.
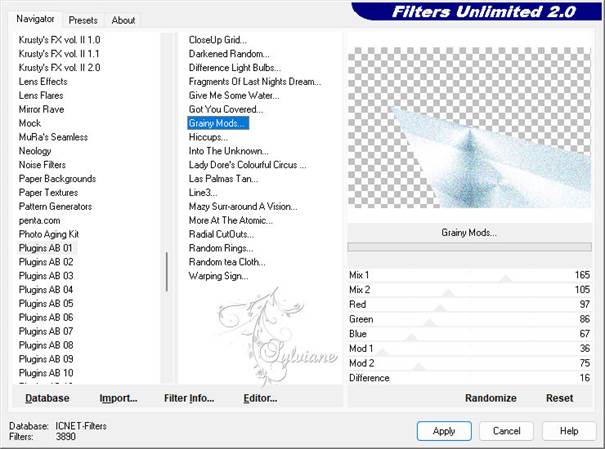
Effects - plugin - Filter Unlimited 2.0. - Plugin AB 01-Grainy Mods
36.
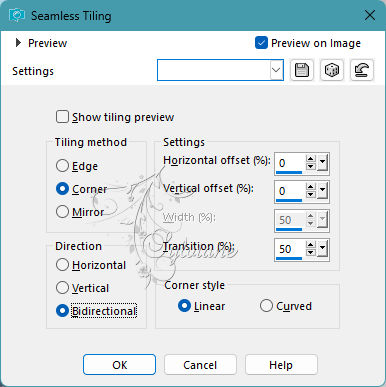
Effects - Image Effects - Seamless Tiling
37.
Layers - Arrange - Move Down
Edit - Repeat move layer down
38.
Set layer opacity to 90
39.
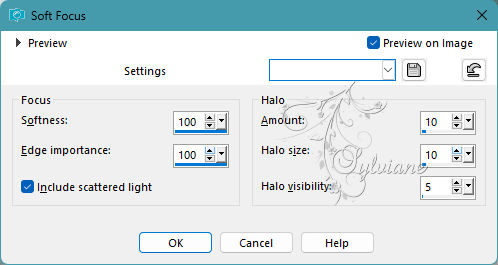
Adjust - Softness - Soft focus
40
Stay on this layer
41.
Layers - New raster layer
42.
Fill the layer with white
43.
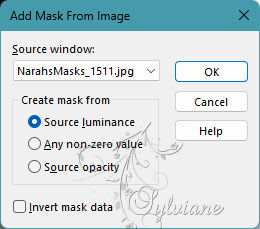
Layers - New mask layer - From image - NarahsMasks_1511.jpg
43.
Layers - Merge - Merge group
44.
Layers - Arrange - Move Down
45.
Activate Copy (2) of Raster 1
46.
Layers - New raster layer
47.
Selections - Load/Save selection - Load selection from alpha channel - selection 2
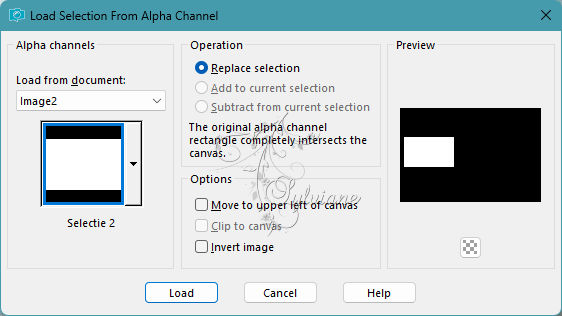
48.
Flood fill the selection with white
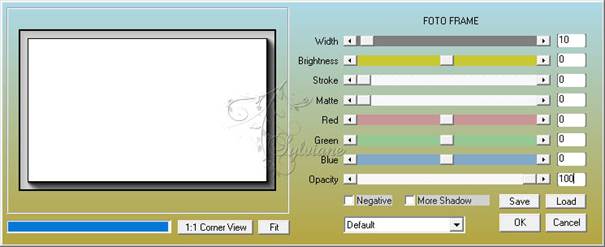
49.
Effects - plugin - AAA Frame - foto frame
50.
Selection - Select None
51.
Selections - Load/Save selection - Load selection from alpha channel - selection 3
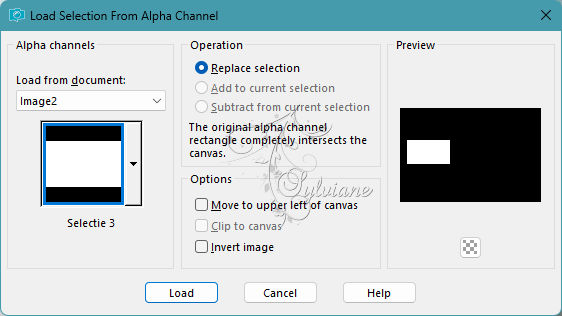
52.
Flood fill with the foreground color
53.
Layers - New raster layer
54.
Take 1 of the included images or choose an image yourself
Edit - Copy
Back to your image
Edit - Paste into selection
55.
Selection - Select None
56.
Layers - Merge - Merge down
57.
Set the blend mode to Luminance (legacy)
58.
Layers - Duplicate
59.
Image - Resize 80 percent - All layers unchecked
60.
Image - Mirror - Horizontal Mirror
61.
Effects - Image Effects - Offset
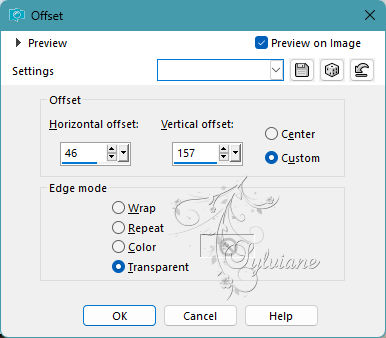
62.
Blend mode stays on Luminance (legacy)
63
Layers - Merge - Merge down
64.
Effects - 3D effects - drop shadow
-6/-6/60/10 color:#648092
65.
Take leny-deco-winter
Edit - Copy
Back to your image
Edit - Paste as a new layer on your image
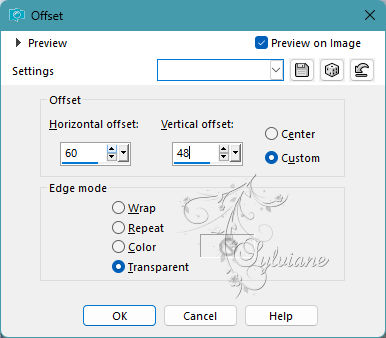
66.
Effects - Image Effects - Offset
67.
Layers - Arrange - Move Down.
68.
Effects - 3D effects - drop shadow
-4/-4/100/30.90 color:#64809B
69.
Stay on this layer
70.
Selections - Load/Save selection - Selection from alpha channel - selection 4
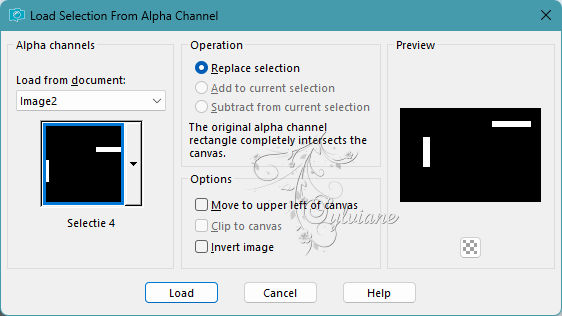
71.
Click 1 time on the delete key of your keyboard.
72.
Selection - Select None
73.
Activate Raster 3
74.
Tube Leny-text
Edit - Copy
Back to your image
Edit - Paste as a new layer on your image
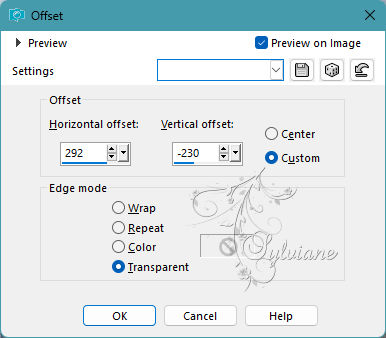
75.
Effects - Image Effects - Offset
76.
Tube leny-decowinter2
Edit - Copy
Back to your image
Edit - Paste as a new layer on your image
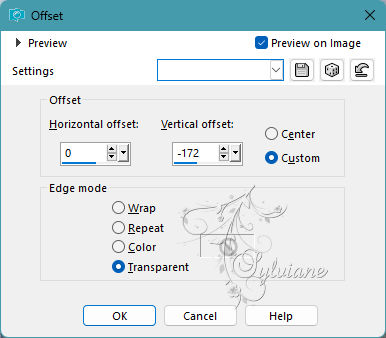
77.
Effects - Image Effects - Offset
78.
Layers - Merge - Merge all layers
79.
Set foreground color to cad5db
Background color on 8aa7b4
80.
Image – Add Borders –symmetric - 1 Pixel - background color
81.
Image – Add Borders –symmetric - 10 pxels - foreground color
82.
Select the border with the magic wand
83.
Effects - plugin - Filter Graphics Plus - Cross shadow - Intensity on 38, everything else is fine.
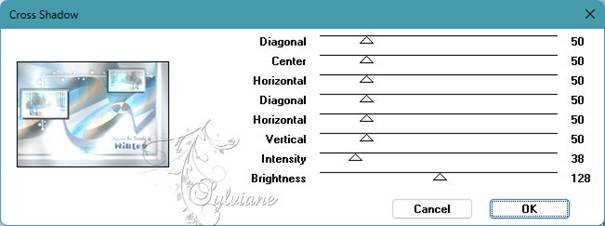
84.
Selection - Select None
85.
Image – Add Borders –symmetric - 1 Pixel - background color
86.
Image – Add Borders –symmetric - 25 pixels - color: white
87.
Image – Add Borders –symmetric - 1 Pixel - background color
88.
Selections - Select all
89.
Image – Add Borders –symmetric - 45 Pixels - color: white
90.
Effects - 3D effects - Drop shadow
45/45/100/0 - color:#cad5db
91.
Selection - Select None
92.
Select the light blue drop shadow border on the bottom right
93.
Effects - plufin - Graphics Plus - Cross Shadow.
The settings are still correct.
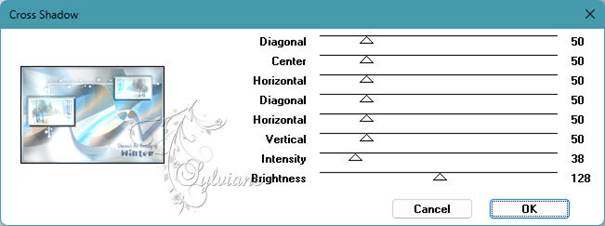
94.
Selection - Select None
95.
Image – Add Borders –symmetric - 1 Pixel - background color
96.
Tube leny-decowinter3
Edit - Copy
Back to your image
Edit - Paste as a new layer on your image
Move to the left top (see example)
97.
Place your name or watermark on the image
Layers - Merge - Merge all layers.
Image - Resize 900 pixels width.
Save as jpg
Back
Copyright Translation 2023 by SvC-Design